

Thursday, May 31, 2012
A Quick Hello . . .
Hello Friends! Just finishing up a few custom orders but I will be popping back in a bit for a fun party idea for you:) Hope you are enjoying the end of your week!!
Wednesday, May 30, 2012
Heavenly Desserts: Homemade Twix Bars...YUM!!!

I just love the thought of turning your favorite store bought candy bar into the yummiest of homemade treats that you can put together yourself, using ingredients of your own choosing and substituting whatever you need or want to!! So today's recipe from food.com for homemade Twix Bars seems like the perfect little weekend treat to surprise your family with, don't you think? Take a look . . .
Ingredients:
(yields 20 large 'Twix' Bars)
~ 5.5 ounces (1 stick plus 3 tbsp) butter, softened
~ 1/2 cup granulated sugar
~ 2 cups cake flour (if available; all-purpose flour is an acceptable substitute)
~ 1/2 tsp salt
~ 1 lb 5 oz soft caramels, unwrapped
~ 2-3 tbsp heavy cream
~ 1 lb semisweet chocolate or chocolate-flavored candy coating
Directions:
1. First, prepare the shortbread cookie base. Preheat the oven to 350 degrees F. Prepare a 13x9 baking pan by lining it with aluminum foil and spraying the foil with nonstick cooking spray.
2. Place the butter and the granulated sugar in the bowl of a large mixer and beat them together on medium speed until light and fluffy, about 3 minutes.
3. Add the flour and salt and mix on low speed just until the flour is incorporated.
4. Scrape the dough into the prepared pan and use your hands to press it into a thin, even layer. Bake the shortbread for a total of 18-20 minutes, turning halfway through so it cooks evenly. When it is finished it should be a light golden brown color. Don't overcook it, or it will be very crumbly. Allow the shortbread to cool completely.
5. To prepare the caramel layer, placed the unwrapped caramels in a large microwave-safe bowl with 2 tablespoons of cream. If your caramels are very stiff, you might want to increase the cream by an additional spoonful. This candy bar works best if the caramel is not too hard or chewy, so adding some cream when melting the caramels helps make it silky smooth.
6. Microwave the caramels until melted and smooth, stirring after every 30 seconds to incorporate the cream and prevent overheating. Pour the melted caramel over the shortbread cookie crust and smooth it into an even layer. Refrigerate the pan to set the caramel completely, about 1 hour.
7. Melt the chocolate or candy coating in a microwave-safe bowl and stir until completely smooth.
8. Remove the caramel-covered bars from the pan by using the foil as handles. Cut the pan into thin, finger-width bars. I usually cut the pan in half widthwise, then cut about 10 bars from each half, for a total of about 20 long, thin bars, but you can vary the size to suit your needs. Use a large, sharp knife to prevent the cookie base from crumbling.
9. Use dipping tools or forks to dip the bars in the melted chocolate, covering them completely. Place the dipped bars on a foil-lined tray and repeat until all bars are dipped. Refrigerate the tray to set the chocolate, about 10 minutes.
10.Store homemade Twix Bars in an airtight container in the refrigerator for up to a week. These are best when allowed to sit at room temperature for a few minutes before serving, so that the caramel can soften.
Twix Bars Variation: If you don't have the time or patience to dip individual bars, you can make these into cookie squares instead. Spread the top of the caramel with the melted chocolate (you will probably use less of the chocolate, perhaps two-thirds of the original amount) and refrigerate it until set. Once firm, cut the pan into small squares to serve. Keep these Twix Squares refrigerated, otherwise the soft caramel will ooze out the sides and make a mess:)


Now keep in mind, these can be a bit gooey, messy, and are definitely not going to be uniform in shape like the kind you find in the supermarket line...but that, to me, makes them even more delicious! Enjoy!!
Friday, May 25, 2012
Color Crazy: Party in Orange!!
If you were with us last week, you'll remember we started a new series over here at Juneberry Lane; all about color and how the right hue can inspire you to have a fabulous party beyond your wildest dreams! Last Friday was RED, so it is only natural to move right along to ANOTHER one of my favorites (oh heck, they are all my favorites:)...ORANGE!!


I just love orange, don't you? And if orange is your favorite color, here is a little bit about you . . .
Orange combines the energy of red and the happiness of yellow. It is associated with joy, sunshine, and the tropics. Orange represents enthusiasm, fascination, happiness, creativity, determination, attraction, success, encouragement, and stimulation.
To the human eye, orange is a very hot color, so it gives the sensation of heat. Nevertheless, orange is not as aggressive as red. Orange increases oxygen supply to the brain, produces an invigorating effect, and stimulates mental activity. It is highly accepted among young people. As a citrus color, orange is associated with healthy food and stimulates appetite.
Orange fans are nature lovers. Being sports minded, they love anything to do with the outdoors. Taking long walks in the woods revives them. Trees and animals mean a lot to them and they want to be a part of nature.
Always aware of their surroundings, they tend to be more adventurous than most. Even though they are impulsive and thoughtful, they generally are very much aware of what they are doing.
Learning and remembering through experience is a strong suit of theirs. Orange lovers believe they are meant to have all the good things in life.
Have a wonderful weekend!!
Wednesday, May 23, 2012
Juneberry Beauty: Color of the Moment ~ Minty Fresh!
Summer wedding season is fast approaching and it is time to start loading up your closet with a few fabulous frocks to have on hand for all of those special occasions in your near future! One thing I've noticed about every wedding or shower I've attended or worked on, is that one special lady usually shows up in a dress that takes my breath away! And looking back, it is mostly the color of the dress that sticks in my memory.
Well, thanks to Hollywood, of course, that color of the moment is hands down Mint Green. Classy & retro, mint green is a fresh & light hue for the warm months that always exudes a carefree, ethereal vibe. Just take a look . . .
Elie Saab started it all with these stunning numbers from the Spring 2012 runway show . . .


Pair with pale peachy nails & pale glossy lips and you are all set!! Mint-tastic!!!
Well, thanks to Hollywood, of course, that color of the moment is hands down Mint Green. Classy & retro, mint green is a fresh & light hue for the warm months that always exudes a carefree, ethereal vibe. Just take a look . . .
Elie Saab started it all with these stunning numbers from the Spring 2012 runway show . . .

And through award season, plenty of celebs hopped on board . . .
And here are a few 'affordable' finds to get you started on your search for the perfect mint . . .
Fun & Casual . . .
Pair with pale peachy nails & pale glossy lips and you are all set!! Mint-tastic!!!
Tuesday, May 22, 2012
Tutorial Tuesday: Cheap & Chic Chalkboards . . .
Okay, remember when I told you we were going to be focusing on keeping things simple from now on? Well, I have been thinking about this quite a lot and I am super excited about the direction our little Juneberry Lane blog is going.
And as you grow right along with us, I truly want to make the commitment to you to keep all of our party inspiration simple and realistic, so that you cannot only feel charged up to create a party of your very own, but you can actually re-create the events and projects that we feature, even on a limited budget and with very little time!!
So part of this little promise includes bringing DIY fun your way that can be used over and over again; sure you might need a different coat of paint or a tweak here and there, but if you have three little kiddos running around we hardly expect you to make three different cake pop stands, 3 different strands of tissue poms, and three wedding worthy dessert tables year in and year out...unless you want to, of course - or at least until they are old enough to help!!
And today's little tutorial follows right along with the idea of being re-usable, because as you'll see below, you can use it all the way from pregnancy to birthdays to even a wedding day if it makes it that far, ha ha ha! Check it out . . .


A Before & After that'll wow you . . .


You can even use these little lovelies to announce your menu at all your future Mother's Day & Easter brunches . . .

And an ever-changing board of pregnancy progress can be put together in a snap!!


And as promised, here is the tutorial from b*spoke blog to get you off and running:
DIY Framed Chalkboard
Supplies you will Need:
~ Vintage-style frame (check flea markets, second-hand stores, TJ Maxx, Garage Sales, your Grandma's attic, or anywhere you don't have to spend a fortune). You will be painting it the color of your choice, so try to see past the ugliest hues:)
~ Background for the Chalkboard (you can just use the glass, if your vintage frame still has it. If not, cardboard, fiber board, or even paper stock will work.
~ Spray paint or craft paint for the frame itself, if the color isn't already up to your standard.
~ Chalkboard paint & roller: You can find this at any home goods store (like Home Depot) in canned paint or spray paint form, whichever you prefer!

Directions:
(1) Find a Frame | Any frame will work for this project. Choose a size that will fit the space you have to hang your chalkboard, and make sure that if the frame is missing the glass, you have a piece cut at your local hardware store. I picked up this relic at a garage sale for only a buck, because I was in love with the ornate details.
(2) Add Some Color | If you aren’t in love with the color of your frame (I just wasn’t digging that rusty yellowish gold hue), coat it with an even layer of spray paint. I chose to use flat paint because a) it was what I had sitting around the house, and b) it went well with the flat texture of the chalkboard paint.
(3) Chalk it Up | Use a small foam roller to paint the piece of glass with several thick coats of chalkboard paint. I did 4 or 5 coats, and allowed plenty of drying time. It is recommended that you wait 3 – 4 days before writing on your new chalkboard surface. Patience isn’t a strong point for me, but I survived the wait! Once your chalked up glass is fully dry, place it in the frame, and use a piece of chalk to “charge it”. You will use the long flat side of the chalk to cover the entire surface, and then use a wet sponge to clean it off. Once it’s dry, your chalkboard is ready for use!
(4) Hang and Admire | Find a spot for your new chalkboard, and hang it as you would any picture frame. Scribble notes, to-do lists, or doodles, then stand back to admire your handiwork!

What's more, once your event is over you can find a pretty spot to hang these chalkboards on the wall and decorate them for the upcoming holidays! Not an artist? You can use your chalk and stencil in the letters or better yet, let the kids make an ever-changing, one of a kind masterpiece!! Have fun!
And as you grow right along with us, I truly want to make the commitment to you to keep all of our party inspiration simple and realistic, so that you cannot only feel charged up to create a party of your very own, but you can actually re-create the events and projects that we feature, even on a limited budget and with very little time!!
So part of this little promise includes bringing DIY fun your way that can be used over and over again; sure you might need a different coat of paint or a tweak here and there, but if you have three little kiddos running around we hardly expect you to make three different cake pop stands, 3 different strands of tissue poms, and three wedding worthy dessert tables year in and year out...unless you want to, of course - or at least until they are old enough to help!!
And today's little tutorial follows right along with the idea of being re-usable, because as you'll see below, you can use it all the way from pregnancy to birthdays to even a wedding day if it makes it that far, ha ha ha! Check it out . . .
A Before & After that'll wow you . . .
You can even use these little lovelies to announce your menu at all your future Mother's Day & Easter brunches . . .

And an ever-changing board of pregnancy progress can be put together in a snap!!
And as promised, here is the tutorial from b*spoke blog to get you off and running:
DIY Framed Chalkboard
Supplies you will Need:
~ Vintage-style frame (check flea markets, second-hand stores, TJ Maxx, Garage Sales, your Grandma's attic, or anywhere you don't have to spend a fortune). You will be painting it the color of your choice, so try to see past the ugliest hues:)
~ Background for the Chalkboard (you can just use the glass, if your vintage frame still has it. If not, cardboard, fiber board, or even paper stock will work.
~ Spray paint or craft paint for the frame itself, if the color isn't already up to your standard.
~ Chalkboard paint & roller: You can find this at any home goods store (like Home Depot) in canned paint or spray paint form, whichever you prefer!
Directions:
(1) Find a Frame | Any frame will work for this project. Choose a size that will fit the space you have to hang your chalkboard, and make sure that if the frame is missing the glass, you have a piece cut at your local hardware store. I picked up this relic at a garage sale for only a buck, because I was in love with the ornate details.
(2) Add Some Color | If you aren’t in love with the color of your frame (I just wasn’t digging that rusty yellowish gold hue), coat it with an even layer of spray paint. I chose to use flat paint because a) it was what I had sitting around the house, and b) it went well with the flat texture of the chalkboard paint.
(3) Chalk it Up | Use a small foam roller to paint the piece of glass with several thick coats of chalkboard paint. I did 4 or 5 coats, and allowed plenty of drying time. It is recommended that you wait 3 – 4 days before writing on your new chalkboard surface. Patience isn’t a strong point for me, but I survived the wait! Once your chalked up glass is fully dry, place it in the frame, and use a piece of chalk to “charge it”. You will use the long flat side of the chalk to cover the entire surface, and then use a wet sponge to clean it off. Once it’s dry, your chalkboard is ready for use!
(4) Hang and Admire | Find a spot for your new chalkboard, and hang it as you would any picture frame. Scribble notes, to-do lists, or doodles, then stand back to admire your handiwork!
What's more, once your event is over you can find a pretty spot to hang these chalkboards on the wall and decorate them for the upcoming holidays! Not an artist? You can use your chalk and stencil in the letters or better yet, let the kids make an ever-changing, one of a kind masterpiece!! Have fun!
Friday, May 18, 2012
Color Crazy: Party in RED!!!
If you've got no idea where to turn to when it comes to planning your next big event, well you just can't go wrong with color!! Over the next few weeks we will be throwing a plethora of hues your way with a tiny bit of inspiration to get those wheels a-turnin' in your head.
And even if your little sweetie, BFF, or husband-to-be has come up with a theme for the birthday party, baby shower, or wedding day that you are less than thrilled with-well then compromise that you get to choose the hues and get carried away with color. . .


And even if your little sweetie, BFF, or husband-to-be has come up with a theme for the birthday party, baby shower, or wedding day that you are less than thrilled with-well then compromise that you get to choose the hues and get carried away with color. . .


RED represents passion and energy. If RED is your favorite color, it means you are impulsive, sexy, and have a will to win. You are a good leader. You want to expand your horizons and live life to the fullest. Loving RED means you have a desire for life and a thirst for adventure!!
And stay tuned for a more color inspiration heading your way in the weeks ahead . . .
Wednesday, May 16, 2012
Out of the Box: Fresh, Fun, & SIMPLE Children's Birthday Parties & Showers Part One. . .
You know, I am all about fancy parties and lavish decorating, but when it comes to throwing a birthday party for my own little tyke, I like to keep it somewhat simple. I mean, realistically we are all busy moms & dads without a TON of extra time to go wedding style fab for a birthday party . . . but I have the strong belief that you don't need to go over the top to go fabulous. It is, in fact, all in the details.
So first & foremost, let's take a look at a fun new 'Out of the Box' children's birthday party & baby shower series from Juneberry Lane that will pop up from time to time in the weeks ahead! And then stay tuned for a party design in our Juneberry Etsy Shop to go along with the theme:)
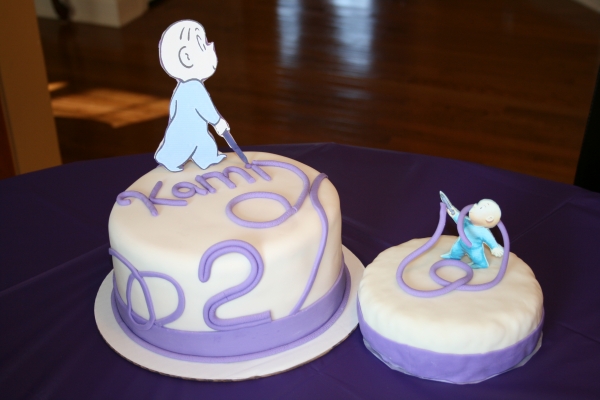
First up, a unique & colorful little shindig based on the favorite children's book 'Harold & the Purple Crayon' by Crockett Johnson Take a look at a bit of inspiration . . .

The most darling invitations . . .

And a charming celebration from Duet Letterpress . . .


And isn't these little details from Delightful Learning~just the sweetest . . .


How much fun is that? I can't wait to bring you even more unique ideas to inspire you along the way! Happy Wednesday!!
So first & foremost, let's take a look at a fun new 'Out of the Box' children's birthday party & baby shower series from Juneberry Lane that will pop up from time to time in the weeks ahead! And then stay tuned for a party design in our Juneberry Etsy Shop to go along with the theme:)
First up, a unique & colorful little shindig based on the favorite children's book 'Harold & the Purple Crayon' by Crockett Johnson Take a look at a bit of inspiration . . .
The most darling invitations . . .

And a charming celebration from Duet Letterpress . . .
Now one thing I am loving about this party theme is that you could make the simplest little backdrop out of white butcher paper and of course, a purple crayon. Not quite as large as this one below (from a dance performance in Chicago by Hubbard Street 2 at the Harris Theatre) but you get the idea . . .
(Photo: Todd Rosenberg)
And isn't these little details from Delightful Learning~just the sweetest . . .
Edible crayon snacks . . .
And some other fun favors . . .

Cute as a button cakes . . .

(Cake courtesy of Sweet Mimsy)
You can always 'girl it up' with a total Purple Extravaganza . . .

How much fun is that? I can't wait to bring you even more unique ideas to inspire you along the way! Happy Wednesday!!
Subscribe to:
Posts (Atom)