If you are not redirected in five seconds, click here.

Thursday, March 31, 2011

Sweet Week Continues...Cupcake Wrapper Inspirations!


Something sweet & sugary must be in the air over here, because I am completely obsessed with all things pretty desserts this week.

And what could cure a sweet craving better than a fluffy, frosted cupcake, you ask?  Well a cupcake wrapped in a gorgeous handmade cupcake liner, of course!

Stay tuned for tomorrow's bonus tutorial; but in the meantime, a touch of inspiration...


Photobucket

Wednesday, March 30, 2011

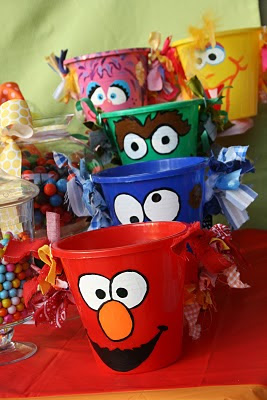
Juneberry Baby: Sesame Street Party (but Fabulous...I promise!)


Okay, so you know how we talked last week about how our little ones will eventually reach an age where they won't want anything to do with our brilliant birthday party theme ideas?

Well, I am pleased to announce that Kate from And Everything Sweet has officially solved this heartbreaking dilemma!  She managed to take an everyday 'Sesame Street' party theme and turn it into one of the most amazingly terrific child's parties I have ever seen!

Feast your eyes on this....


Photobucket

Tuesday, March 29, 2011

Tutorial Tuesday: DIY Cake Pops!!


Now who in the world could possibly not love a cake pop...one tasty bite of decadant & fluffy cake deliciousness decorated all sorts of fabulous and served up on a stick?  And who knew they were so simple to make and so much fun to personalize?  

Seriously, a cake pop can be fashioned to fit into absolutely any party theme that you could possibly ever dream of.  Hit up the craft store to pick up a few inexpensive supplies and then get to work in your kitchen, following the instructions below (courtesy of our friends at Rock N Roll Bride) to whip up your very own batch...designed any which way to whatever suits your fancy!


Difficulty Level: Moderate

Supplies you will need:
~ A cake (I've used a double batch of red velvet cake-pictured below.  If you use a boxed cake like Duncan Hines or Betty Crocker, use one package for every 25 cake pops)
~ Icing (I've used one batch of cream cheese icing.  If using the pre-made cans of frosting that you buy in the grocery store, use half a container for every 25 cake pops)
~ 800g chocolate coating (these are called 'candy melts' and can be purchased in a variety of colors at craft stores like Jo-Ann Fabrics and Michaels)
~50 paper lollipop sticks (size-15cm and also found at Jo-Anns or Michaels)
~Sprinkles or sugar roses to decorate
~Styrofoam block (or something to stand your pops in as they dry-can be found at major craft stores)
~Cellophane bags (optional) & Ribbon (optional)-if you want to wrap the cake pops up separately to give out as favors.


1.)  Crumble up your cooled cake into a large bowl (this feels very wrong but fun!)


 2.)  Mix in the icing until well combined


3.) (Once the frosting & crumbled cake are mixed, it helps to set the bowl in the freezer for 30 minutes before you roll the cake mixture into balls...it will be less likely to crumble that way).  Roll into balls that are about 3cm across (this is the messy bit!), place on 2 lined baking sheets and cover with foil or cling film before refrigerating for at least 2 hours or overnight.


4.) Melt your chocolate coating in a bowl by following the instructions on the packet - I use the microwave on defrost setting and stir after every 30 seconds

5.) Dip each lollipop stick about 1cm into the melted chocolate coating and push half way into each cake ball - this helps the cake ball to stay on its stick


6.) Once set, dip each of your pops all the way into the chocolate coating including about 1 cm of the stick, tap off the excesses chocolate, add your decoration and stand in your styrofoam block to dry.


7.) That's it! They only take 30mins or so to dry and then you can wrap them with lollipop style cellophane bags or store them in a tin lined with greaseproof paper. They keep for about 7 days in a cool place.

Makes about 50


My top pop tips: 

1.) You can try other flavors of cake - chocolate cake with chocolate icing works well and lemon and poppy seed cake with lemon icing is next on my list to try.

2.) Make sure that your cake balls are properly chilled before you dip them (otherwise they fall off of their sticks!)

3.) I use Wilton Candy Melts for my chocolate coating as they come in different colors and are easy to melt.

4.) Get in there quickly with your sprinkles or decorations as the candy coating dries pretty quickly.

5.) Make lots as they'll all get eaten!


http://www.rocknrollbride.com/
Photobucket

Monday, March 28, 2011

Cake Pop Extravaganza!!


So if you have been out and about pretty much anywhere, you have more than likely noticed the 'Cake Pop Rage' that is sweeping the nation.  People everywhere love them and how can you blame them? All of that goody deliciousness baked up into one little scrumptious bite!

So tomorrow I will be sharing with you a simple, fun tutorial on how you can begin to master cake pops of your very own.  But for today, as I step into my own kitchen and prepare to conquer a red velvet cake in hopes of making the lovely bites of decadence for the very first time,  let's dream that we are on our way to being Cake Pop masters and of all the edible art that we will be able to create in the future.

Thanks to Bakerella, the hands down expert in all thing delicious dessert, we have some fabulous inspiration to kick off our journey towards Cake Pop brilliance!


And a few more favorites...


And dare I say..Pie Pops??!!  Oh my, I am going to be one busy baker...


Photobucket

Friday, March 25, 2011

T.G.I.F.: Red Chile~Guava Margaritas!


Photo by Public Restaurant, NYC

It is Friday...time to kick off your shoes, throw your feet up, and celebrate the arrival of Spring with a spicy, tropical margarita, created at Public in New York City.

The “Red Chile” in this drink’s name comes from homemade Chile-Infused Tequila. Be sure you make it a couple of days in advance to get that spicy kick this cocktail deserves. See the recipe below...


THE MARGARITAS:

2 1/2 cups Chile-Infused Tequila (see below)
1 1/2 cups Triple Sec
1 1/2 cups guava nectar (you can find it at health food stores and most Southern California groceries)
1 cup fresh orange juice
1 1/2 cups fresh lime juice
10 lime wedges
Salt, for rimming the glasses
Ice
10 small red chiles, for garnish (optional)

INSTRUCTIONS
Combine tequila, Triple Sec, guava nectar, orange juice, and lime juice in a pitcher and reserve in the refrigerator until ready to use.
To serve, rim a rocks glass with salt by rubbing a lime wedge around the outside and then dipping the glass in salt. Fill the glass with ice, add the margarita mixture, and garnish with a skewered chile pepper (if using).

***TO MAKE RED CHILE INFUSED TEQUILA:
~ 6 small, dried red chiles, halved lengthwise, seeds removed
~ 1 (750-milliliter) bottle 100 percent agave tequila

INSTRUCTIONS
Place red chiles in tequila. Allow to infuse for 1 to 2 days.
Photobucket