If you are not redirected in five seconds, click here.

Monday, December 26, 2011

Nifty New Year's . . . 5 Easy DIY Projects for a Shiny, Happy Holiday

Whether you're having a little holiday bash to ring in the New Year or an all out slamming shindig, these quick little decorating ideas are sure to add zing to your party and are easy as pie and just as sweet!  Take a peek . . .

(image courtesy of http://www.elledecor.com)

You already have your ornaments out, so why not get a little more use out of them before you pack them away until next year?  And just in case you want something in a different color scheme than your typical holiday decor,  all of the stores just happen to be selling the most gorgeous & shiny bulbs (check out Target or Pier One!) for 50% off, so you are in luck!  Here's what you do . . .

Easy Ornament Mobile

This pink and silver ornament display is festive enough for Christmas but in non-traditional colors, it won't go stale after the 25th and will look fabulous for New Year's Eve. Hang a cluster of simple colored and glass ornaments to a metal ornament frame (available in craft stores) for an eye-catching display. To create a cascading effect, secure ornaments to the mobile’s hooks with varying lengths of thread or fishing line.

(image & tutorial courtesy of http://www.marthastewart.com)

Countdown Champagne Flutes

For a fun twist on the New Year's Eve countdown, pass Champagne in glasses marked with numbers representing those anticipated last 10 seconds. Self-stick numbers can be found in office- and art-supply stores. On January 2, either peel off numbers (use a cotton ball and adhesive remover to wipe away residue) or save the flutes for next year.

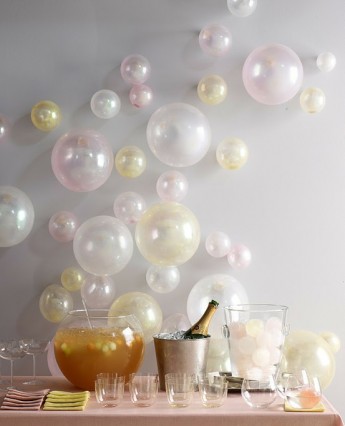
And I just love this darling drink station too; so simple to put together (all you need are a few balloons!) but this really packs a punch and will certainly add a bit of festive fun to your fete . . .


Balloon Backdrop

Just blow up pearlized balloons in varying sizes (some less than others) and tape it to the wall for the easiest backdrop ever!

(photo & tutorial courtesy of http://somewheresplendid.com/)

Sparkly Star Cocktail Swizzle Sticks

Supplies You Will Need:

~ 2″ sequinned star appliques
~ bamboo barbecue sticks (available at Target or your local grocery store)
~ craft felt, preferably matching your sequin color
~ hot glue and a glue gun
~ scissors

1.) Lay the sequinned star over the craft felt and cut the felt to the size and shape of the applique. Place the applique sequin side down, and position the bamboo skewer in the middle of the applique. The placement should be set so that the top of the skewer aligns with the horizontal edges of the top left and right star points, and the skewer stem aligns with and breaks through the center of the bottom two points. Hot glue the bamboo skewer in place in this position. Set aside with its matching felt cutout to cool and set, and continue creating more as needed.

2.) Draw and outline of hot glue around the edge of the felt cutout, then draw a small “X” of hot glue in the inside of the outline. Press the felt cutout over the applique and the bamboo skewer to create a covered backing for a finished look.

And in case you have friends who tend to overindulge in festive cheer, these little 'Hangover Kits' are the perfect way to send them off in the wee hours of the morning (in a cab, of course:)

(image & tutorial via http://www.thinkgarnish.com)

Hangover Kits

Your local drugstore or Target has a huge selection of travel-sized goodies that are just the right fit for your party survival kit.  Throw in goodies like Advil, Tums, Emergen-C, tissues, hair ties, and a small bottle of bloody mary mix and your guests will be sure to thank you come morning.  Tie the whole thing up with twine and add a sticker and you are all set!


Juneberry Lane will be on hiatus until after the holiday!  Hope you all have a very Happy New Year and we will see you in 2012!! Photobucket

Thursday, December 22, 2011

Holiday Snack Mix (and Santa Hats out of Bugle Corn Chips?!?)


Oh dear, you have a load of company coming over and you need a few snacks to lay out to keep your guest occupied while they sip their cocktails or await the holiday dinner!  Well, no worries!

These adorable Santa Hats from Oven Love (made out of the cone-shaped corn chip Bugles, no less!) can be thrown into a regular bowl of store bought Chex Mix or whipped up alongside a bowl of your homemade variety, if time permits!  Take a look . . .


Ingredients for Bugles:

~ 1 bag of regular or caramel Bugles (typically near the ChexMix at the store)
~ Red candy melts (the kind you usually use for cake pops)
~ 1 tablespoon shortening
~ Mini marshmallows (just a handful is enough)
~ White nonpareil sprinkles

Directions:

1.) Melt the candy melts and shortening together in 30 second intervals in your microwave until melted. As soon as everything is melted, start dipping the Bugles into the chocolate, letting the excess chocolate drip off. Let them set up until firm on parchment or wax paper.

2.) When the Bugles are set, remelt the red chocolate if necessary and dip just the bottom of the Bugles into the white sprinkles. Then flip the Bugle over and dip the top in red chocolate and firmly press a mini marshmallow on top. Let set again on the parchment or wax paper.

For the snack mix (if you are making it yourself):


~ Your Bugle Santa hats (see above for procedure)
~ 3 cups mini pretzels
~ 1/2 cup dried cranberries
~ 1 cup salted dry roasted peanuts
~ 2 cups Rice Chex
~ 2 cups holiday M&Ms
~ 8 oz white chocolate

Directions:


1.) Spread all of your ingredients, except M&Ms, out on a large baking sheet lined with parchment or wax paper. Melt the white chocolate according to package directions and drizzle over the ingredients.
2.) Use a spatula to mix and cover the ingredients evenly with white chocolate. Allow the mix to dry on the baking sheet.
3.) When the chocolate is set, break the pieces up and sprinkle the M&Ms and Bugle Santa hats over the mix. Transfer to a serving bowl and enjoy!


In the mood for something sweeter?  Just throw them on a cupcake then . . .


Aren't they perfect?!  And so easy to throw together too!  That is pure festive fun right there, I tell you!! Photobucket

Wednesday, December 21, 2011

A Coffee Filter/Cupcake Liner Christmas . . . Behold, A Paper Tree!


Now just in case you don't have any extra yarn laying around for the tree tutorial I sent your way the other day, I thought I would give you another option, an easy little how-to from Centsational Girl to use up some supplies you might have in your cupboards already.  And I just know you have cupcake liners or coffee filters in there!

And wouldn't these trees be just beautiful on either side of your holiday buffet or dessert table?  Now whether you use the coffee filters or the cupcake liners is up to you, it all just depends on what size you are looking for!  Let's get to it!

COFFEE FILTER/CUPCAKE LINER CHRISTMAS TREE


Supplies You Will Need:

~ White paper cupcake liners (or coffee filters!)
~ White 12" x 12” cardstock or poster board (if you are using the coffee filters)
~ Clear packaging tape (not shown)
~ Hot glue gun
~ Mini ornaments


Directions:

1.)  Roll your cardstock or poster board into a cone shape and secure with packaging tape (if you’d like to insert an ornament on the top leave a big enough hole).  2) Fold the cupcake liners into quarters, then snip the edges to separate the layers into frills.  3)  Begin at the base to hot glue to your cone.  4) Once you’re finished gluing the layers, embellish with mini ornaments secured with hot glue.

A few more to get those wheels turning . . .

(photo courtesy of http://mirrorsmetaphorsandkaleidoscopes.blogspot.com) 

(photo via http://christmas.tipjunkie.com) 

(image via http://www.thenester.com) 

Love these darling little ornaments . . .

(photo courtesy of http://christmas.tipjunkie.com) 

Or you could hand-dye those filters or liners and end up with something along the lines of this tissue-paper beauty . . .

(image via http://spunkyjunky.blogspot.com)

Aren't they just gorgeous?!  This is the perfect little craft to keep your hands busy while you watch your favorite holiday movie too . . . that way you can keep out of the cookie jar and save some of those treats for Santa!! Photobucket

Saturday, December 17, 2011

DIY Yarn Christmas Tree Tutorial


So your shopping is done, your presents are wrapped, the stockings are stuffed, and your baking is finished and you are looking for a few last minute centerpiece ideas for your holiday table?

Well, look no further, because these gorgeous little yarn Christmas trees are so simple to do and so creatively chic, and you know you have too much extra yarn lying around anyway, right?  Check out this fantastic little Christmas tree tutorial from One Happy Mama . . .

YARN CHRISTMAS TREE


Supplies You Will Need:
~ styrofoam trees (found at your local craft store)
~ yarn (used really fuzzy yarn for an even more whimsical feel)
~ hot glue gun
~ felt
~ toothpicks
~ glue dots
~ star punch or star die cuts
~ felt balls


Directions:
1.) Start by tracing the bottom of each tree on your felt. I used some dark brown felt, but you can use any color since you won't really see this felt - it'll just cover up the styrofoam on the bottom protecting any surface that you place it on. Once you have the circles cut for the bottoms - hot glue them on each tree.


2.) Next get your yarn ready, put a bead of hot glue along the very bottom of the tree base and then place your first row of yarn on it. Be careful not to burn your fingers! ;) You can do a little at a time to be sure you don't. ;)

3.) Go around the bottom with the yan and then once you have that first row secure, continue wrapping and wrapping the yarn all the way up the tree. You don't even have to wrap it perfectly - I had my yarn overlapping, etc., and it turned out cute and whimsical. This craft isn't suppose to be difficult and sress you out - only fun with cute results! ;)

4.) Once you get to the top, clip off the yarn right before the very tip of the styrofoam tree, unless your tree has a pointy top. If it does - just continue wrapping it and clip it off and secure it down with glue. If your tree is like mine and had more of a flat top - what I did was clip off the yarn once I got to the top and then put some glue on the top of the tree and then starting in the center, I started with the yarn and then wrapped it in a circular pattern until the top styrofoam was covered.

5.) Then for a cute touch, I added some felt balls that I had to the tree for little ornaments. You could very easily just leave these trees bare for a simple look - I wanted a bit more whimsy so I put the felt balls on the tree. You can be creative and use other things too like pom pom balls, jingle bells, etc.

6.) Lastly, I punched out two star for each tree using a star punch and some pink glittered American Crafts cardstock and then I put a super strong glue dot on one star, placed the toothpick on top of that glue dot and then added another glue dot on top of the toothpick and then added the other star on top of it. Then I stuck the toothpick into the top of the tree.

Voila. Cute Christmas yarn trees.


And as always, a tiny bit more to get your wheels a-turning . . .


Aren't those colors just lovely?  Or you could go a more simple route if you prefer  . . .


(photo courtesy of http://digeny.blogspot.com/2010/12/diyable-christmas-tree-countdown-yarn.html)


Aren't they darling?  And simple to make too!  Stay tuned for a couple last minute Tree Tutorials.  You are going to just love them, I promise!!  Hope you are having a wonderful weekend!
Photobucket

Friday, December 16, 2011

Hello & Hooray!!

Whew!  Two days of holiday traveling madness and I am just finally beginning to come back to my senses.  Toddlers and layovers just don't mix, by the way.  But luckily, we will be back tomorrow with a whole bunch of inspiration fun!

There is nothing better than being home for the holidays and receiving wonderful news . . . and tonight we got the best news ever, that my sweet little sister, Meggie (you know, the one who is always sending us that amazing baking inspiration?)  Well, she just got engaged this evening . . . and you know what THAT means.  Tons of wedding planning fun . . . and bridal showers, engagement parties, and bachelorette parties too!!!

I am so excited.  Just take a look at this gorgeous ring . . .


And yes, that is "Going Gonzo" from the Muppet line by OPI, in case you were wondering:)  Hooray!!! See you tomorrow! Photobucket

Wednesday, December 14, 2011

Wedding Wednesday: 'Snowed In' ~ A Winter Wonderland Delight . . .

Remember that amazing yarn pom tutorial we sent your way last week?  Well, I am beside myself with glee to bring the entire event to you today; a one-of-a-kind, DIY masterpiece of a winter wedding that will have you gasping with delight.

Created by the talented photographers over at Wednesday and sent our way via one of our favorites, Green Wedding Shoes, this beautiful Big Day is cozy & playful and full of all sorts of fun little elements that will knock your socks off.  Just take a look . . .


Lovely invitation design from Wednesday's stationary collection . . .


Who knew a hundred & eighty strands of marshmallows could ever be so magical (and so friendly on the budget)?  I can just hear your husband-to-be now: "You want to do WHAT?!" . . .


These vintage, doily style tablecloths are too die for . . .


And the yarn garland that we showed you the other day . . .


I simply adore how this clever little couple turned up the winter coziness by replacing the traditional cake table with an array of comforting breakfast treats; piles of pancakes & crepes to doughnut holes and other brunch yumminess to really warm the belly on a cold day . . .


How fantastic are these DIY homemade tea bag favors?


Simply gorgeous, no?  And who in the world wouldn't want breakfast at a wedding?  Happy Wednesday!!


Fabulous Vendors:
Concept, styling & paper goods: Wednesday
Photography: Ely Fair Photography
Florals: Rebecca’s Silver Rose
Venue: White Dog Hill, Clinton, OK
Bridal veil: Collected Thread D
Dress, earrings and garter: Meg Guess ~ original dress design: Harper Henry
Wrap cover-up: Bhldn
Table settings: Pottery Barn
Hair: MaKenna Estes
Make-up: Sarah Roark
Pancakes: Beverly’s Pancake House Photobucket

Tuesday, December 13, 2011

Tutorial Tuesday: Green Gift Series ~ Homemade Hot Fudge Sauce


This next homemade gift in our 'green gift series' is the perfect present to remind your friends & family just how much you love & appreciate them.  And best yet, every time they have a delicious ice cream sundae they will think of you and just how much they return the feelings:)

This delectable 'hot fudge sauce' will last them all the way until spring and is such a  cinch to make that you won't be able to settle for the pre-packaged variety ever again.  Check out this fantastic recipe from My Own Ideas. . .

HOMEMADE HOT FUDGE SAUCE


Ingredients:

~ 3 Tbsp unsweeted cocoa powder
~ 1/2 cup whipping cream
~ 1 – 1/2 cups light corn syrup
~ 12 ounces semi-sweet chocolate chips
~ 4 Tbsp butter
~ dash of salt
~ jars (I like THESE ONES by Ball)


Directions:


1.) In a pot on the stove, mix the cocoa powder with the cream and stir on low until the powder dissolves into the cream. Add the remaining ingredients and stir over low heat until thoroughly mixed.

2.) Bring to a slow boil, and simmer, stirring, for about five minutes until thickened a little. Allow to cool to lukewarm, and pour into jars. Makes about 4 cups.
**To serve, heat until it reaches a stirrable consistency, pour over ice cream.

Variations: 


Mexican Hot Fudge Sauce
~ Add 1 tsp ground cinnamon along with the rest of the ingredients.


Mocha Hot Fudge Sauce
~ Add 2 Tbsp instant coffee powder along with the rest of the ingredients.


You can get the above labels at: My Own Labels.  And a few more excellent examples. . .


(photo courtesy of http://elementsdesign.com)


(photo via Style Me Pretty)

There now, isn't that just as easy as pie?  These would be amazing favors for that chocolate loving bride or even an 'Ice Cream Social' Birthday party or Shower, right?

And you know I wouldn't leave you empty-handed after all of your hard work, so here is a free printable tag to add a quick hole-punch and a strand of twine to, and tie around the neck of your mini-mason jar . . .


You can download the page of multiple files here:

Hot Fudge Sauce Multiple

We certainly have been spending some quality time in the kitchen this season!  Why, we're regular Betty Crockers these days, aren't we? Photobucket